Thursday, May 23, 2013

Mini Apple Wraps

I was having a bad day, well a bad week really... so I decided to cook, and bake this afternoon... I'd seen something like this come across my Facebook page last week, using Pillsbury Crescent Rolls © - but since I didn't have any of those, I thought I'd just make some pie crust (something I love, and am good at making) and I figured I could do better than wrapping a slice of apple in some cinnamon sugar too... When you read this recipe, it might seem like a LOT of work and a LOT of time, but I assure you it's not... you are doing *this*, while *that* is resting and *that* is cooling etc. so it all kinda over laps - TOTAL time from I started until I ate one, was an hour - a stress free (can't wait for the YUMMY )hour, and that included time for cooling. (ha~ha well, kinda)

Preheat oven to 375°                                            Prep Time 30 minutes
Grease Cookie sheet                                           Cook Time 20 minutes

butter flour salt water 2 apples spices corn starch


PIE CRUST:

1 Stick of butter; cut into cubes & placed in the freezer for 30 minutes
½ cups flour
½ teaspoon salt
3 Tablespoons ice water

Throw into your food processor (or mixer) the flour, salt and chilled butter. Mix on low until crumbly; add chilled water 1 Tablespoon at a time. A ball of dough will form. Wrap the dough in saran wrap and place in the fridge for about 30 minutes to let it *set* 


In a medium size bowl, (this is to taste) a couple Tablespoons of flour, ½ cup brown sugar, some ground cinnamon, ground nutmeg, ground cloves, ground allspice, and a teaspoon of corn starch.  - set aside


Peel and core 2 medium sized apples... normally, I would use Green (or Granny) but I just happened to have Gala, so Gala it was, (I am a big proponent of just using whatever is *on hand*) I have a gadget that my mom got me this past Christmas, Thanks Mom! that peels, cores and spiral slices my apples in seconds! ($20 at Target) one of the BEST gadgets ever!  Just slice your apples as you would for a normal apple pie, maybe a bit smaller. 

Now to help speed up the cooking process of the apples, I blanched them (Place in boiling water for about 2 minutes, then directly into the sink, in a colander, with cold water running over them for a couple of minutes) Now, shake all the water from the apples, and put into the bowl with the spices and brown sugar mixture, and gently coat - set aside.


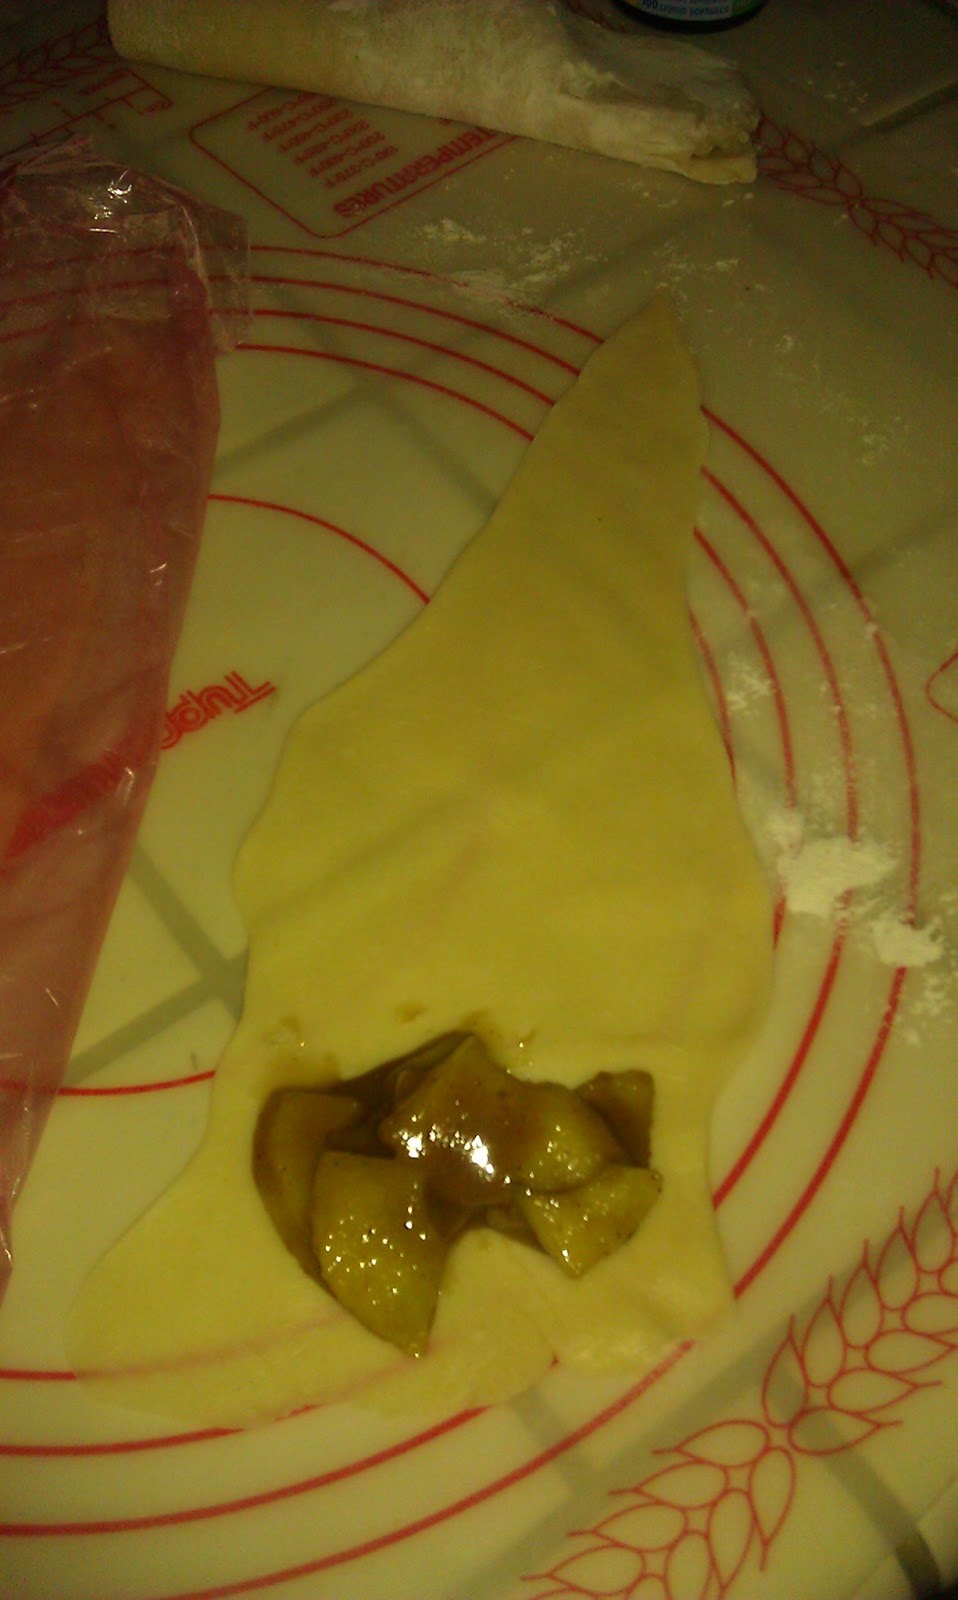
Take out your crust, and roll out - I had to work with this a little bit, and discovered it was best to roll it out as normal, then cut it to *crescent roll shapes* aka long triangles.
After I cut out the shapes, I rolled them once again to ensure they were thin


Add a bit of the apple mixture to the wide end and roll, pinching the ends as you go to seal the juices in. 


Once all are rolled, brush the tops with the left over *sugar juice*


Before
 Bake on a well sprayed, foil lined cookie sheet @375 for 20 minutes. Let cool on the sheet so the brushed glaze will harden and *crisp* it's yummy too!


After


ENJOY! 


Saturday, December 22, 2012

Displaying your wares

Just in time for the Holidays, a quick and easy 
BEAUTIFUL raised platter. 
(Mine will display my Christmas Cookies)

Total Cost $3.00

Supplies (mine were all gotten at The Dollar Tree)
  • A 3"-4" glass taper candle holder
  • A plastic plate charger
  • A simple dinner plate
  • Gorilla Glue or Super Glue

Using the glue, attach the candle holder to the bottom of your charger TA-DA, you're DONE! lol


You can also make one for more of a "kids table" or maybe for the "kids" desserts...

Just a plastic platter glued to a short candle stick :)


Friday, October 19, 2012

Wanton Mozzarella Sticks

Delicious, easy and quick!
Wanton Mozzarella Sticks

You need:
  • Wanton wrappers (found in the the cooler section of your grocery store)
  • String cheese 
  • Oil

Cut your string cheese sticks into 8ths; 
first cut in half (so it's only half as long), 
then cut those in half (so it's half as thick) 
and then in half again (so it's half as thick) 
you now have 8 pieces that are ready to wrap.

Take one wanton wrapper, one piece of cheese and wrap like you would a burrito.
Place your wrapped cheese (open edge down) in the PRE-HEATED oil
These cook and brown FAST!! so dont walk away! about a MINUTE, minute and a half on each side.


ENJOY!

Wednesday, October 17, 2012

Never again will I be without it!

what is "it" you ask??? 


 APPLE BUTTER 

Granny Smith and Fiji 4-1 ratio

(homemade of course)

 Total time 9-11 hours - Yields approx 4 pints

I found the recipe on   

so I don't want to steal the credit here... 
as usual though I did some tweaking  
of my own to suit my tastes.
I wanted to blog it myself so that those I know can have the recipe at their finger tips! 
This is an ALL day affair, but you really dont need to be there much since it is made in the slow cooker! (aka crock pot). 


Delicious end result


 Here's what you will need to get started:

  •  5 1/2 lbs apples - cored, peeled & finely chopped
  • white sugar

  • ground cinnamon

  • ground cloves

  • salt

I used 4.5lbs of Grammy Smith green apples and 1lb of Fiji apples
I STRONGLY suggest  starting off using 2 cups of sugar... remember, you can always add more, but you cant take it away. :)


Directions

The finer the chop the faster the cook time


 Place the cored, peeled and chopped apples in a slow cooker.


In a medium bowl, mix the sugar, cinnamon, cloves and salt. 
Pour the mixture over the apples in the slow cooker and mix well.
Coat the apples with the sugar mixture well


Cover and cook on high 1 hour.


Your house will smell good ALL DAY!

Reduce heat to low and cook 9 to 11 hours, 
stirring occasionally, until the mixture 
is thickened and dark brown.


Uncover and continue cooking on low 1 hour. 
Stir with a whisk, if desired, to increase smoothness.
Mmmmmm almost done


Cool over night and enjoy in the morning!

Spoon the mixture into sterile containers, cover and refrigerate or freeze.

Friday, September 14, 2012

My Favorite Cards

I have greeting cards from various occasions that I have kept, I know most of us do... but what do we do with them?? I know over the years when I have moved and done the "clean it out before you pack it" things...sometimes I have gotten rid of them (such a shame). NOW we can display them! I am in the process of creating a "wall effect" but wanted to post the idea and how to so you could get started on yours.

You will need:
  • Balsa Wood
  • Foam Brush
  • Mod Podge (or other adhesive product)
  • Ribbon (for hanging)
  • Scissors
  • Beads (optional)
  • Glue gun (or other glue for ribbon & embellishments)

At any craft store (or even the craft section at Wal-mart) you can buy the light weight cutouts of Balsa Wood, they come in various designs. Balsa is easy to work with, for our project, you can use it as is, you can pre stain it, you can pre paint it too. I have done all three for different looks, different "moods" of the cards I'm working with etc.

Take your card and cut it anyway you like to fit on the balsa wood. I've used some decorative scissors I picked up at a craft store for a nice pretty edge. In my sample here the written message was just as important to me as the memory of the card, So I added it to the back of my piece (also using my Mod Podge)


Once you have your balsa wood the way you want it, (e.g. painted, stained) get out your Mod Podge, I've used the Mod Podge Gloss for this project - USUALLY the label peels right off the wood, this time it was tearing, so I just went right over the top of it.Take your foam brush and give a nice coat of Mod Podge to your balsa wood, place your card and smooth out excess adhesive. make certain the edges are down and sealed. let dry (doesn't take too long) then give a nice coat of the Mod Podge to the over the top.


IF you are interested in adding any type of embellishments, beading, lace etc. now is a good time. I used a glue gun for the beading I like the added security of the glue. Once you have placed any embellishments let everything dry again and go over one last time with a coat of Mod Podge to seal everything up.


Once completely dry, heat up the glue gun we are going to add a ribbon for hanging. there are a few ways of making the ribbons pretty, use your imagination. (suede or silk cords work too - just depends on the LOOK you are going for) Decide how long you want your "hanger" to be, cut your ribbon.
 
(Pre tie your bow if using that look)
No bow, just a loop
Using your glue gun, glue your ribbon to the back of the wood. 
Allow to dry and WALA, your ready to hang it!

Saturday, September 8, 2012

White Chicken Burritos

A twist on White Enchiladas, I always do everything with my own twist :)
This is really easy and pretty quick, you can make ahead or same day.

Preheat oven to 350°
♦♦♦ Yields 9 GOOD SIZED Burritos ♦♦♦

Grease 9x13 pyrex

Filling
1 Can White Chicken
1/2 Can Cream of Chicken Soup
1/2 Cup Sour cream
1 Can pinto beans
1 Cup (pre-cooked) white rice (can use Spanish rice)
1/2 Cup Cheddar cheese (shredded)
1/2 Cup Mozzarella cheese (Shredded)
1 bundle of green onion (finely sliced)
Sliced black olives
Large Flour tortillas
(and really, whatever else YOU like... be creative)

In a medium sized bowl combine everything (yep everything above) reserving a little bit of olive, green onion and both cheeses for the sauce.
Take a tortilla, spoon in a couple tablespoons of filling fold up in typical burrito fashion and place seam down in greased pyrex dish. (repeat until gone - you may need a second pyrex dish)

Sauce
1/2 Can Cream of Chicken Soup
1/2 Cup Sour Cream
some of each cheese
some olives
some green onions

In a small bowl, combine the other 1/2 can of Cream of Chicken soup and 1/2 cup of sour cream - spread over the top of the burrito's (really slather it on there) then sprinkle the rest of the cheese, green onion and sliced olives over the top.


Bake in your preheated oven for 30 Minutes and serve 
(I will need to add a "Cooked" photo next time, I forgot to snap one before we ate this go round)
Garnish with Sour Cream, Salsa, Avocado - whatever tickles your tummy!


Fruit Crunch Breakfast/Brunch Cake


Pre-heat oven to 350○ (oh and ya might want to make sure the bottom of your oven is lined with foil - just sayin' LOL)


Favorite fruit (sliced or chunked) - I used the CANNED peaches and pineapple I had on hand. (Apples, plums or pears would also be nice choices)
1 box yellow cake mix
1 stick butter melted (don't judge)

2 T butter melted
1/4 cup brown sugar (packed)
1/4 cup quick oats 


Butter a 9" round cake pan


In a small bowl combine brown sugar, quick oats and 2 T softened butter 
(just mush it all together)
 
put into the buttered cake pan, gently pressing down all around the bottom.


  layer in your fruit

  Sprinkle your dry cake mix to cover the fruit, drizzle the melted butter on top (it might not cover every little bit, that's okay) I also used a little bit of my left over fruit juice...


NOTE: with the peaches and pineapple the cake was a little soggy... but once is cooled off it solidified. ohhh so delish
Next time Im going to do apples and blueberries maybe! I think those fruits would make it firmer and also yummy! there are endless options, experiment with your favorites